Photos are typically the heaviest components of a webpage to load, so it is important to optimize them correctly. There is quite a bit to image optimization, but in this post we just look at compression.
Why Bother?
Some plugins and services offer image compression on the fly, but it is ideal to optimize images before uploading them to WordPress or your server.
These image optimization plugins and services are great, but by uploading already optimized images, you start out with images that weigh so much less, and these services will then require less work, time, and server resources (even if it is a third party server or CDN) to perform other optimization tasks for your images. This is not to mention the obvious benefits of decreased server disk space, and a not-as-heavy media library that is snappy and quicker to scroll through, smaller size of backups and less time to backup, etc, etc.
But My Plugin Already Compresses During Upload
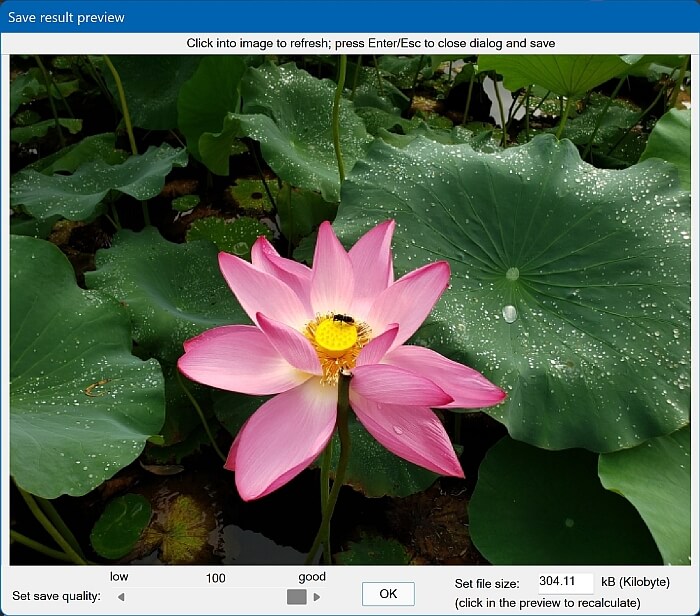
Okay. That is definitely convenient. But sometimes you want more control. The tool I am mentioning here lets you decide which is more important: file size, or image quality. And not just with numerical limits, but you can actually SEE and preview the image with a compression and file size slider.
Of course, images taken on modern smartphones are generally WAY too high a resolution and file size than is necessary for the web, so let’s get ’em optimized first.
How Does It Work?
The tool is part of the IrfanView image editing software, which is not a new program itself, but only since December 2021 was the feature released that lets you use the image compression slider with a preview. You can even do this in batch, and you can choose whether you want it to prompt you for each image or else use a specified value for all the photos!
(I am not an affiliate or anything, just recommending and illustrating a technique I use myself.)

Note the preview is available for saving JPG/GIF, but not for PNG.
Obviously the higher the quality, the larger the file size, and the slower it will be to load. So, this tool lets you decide what is the most lightweight image you are willing to use, based on the image quality that you see.
IrfanView is a powerful tool, but I will try to focus on using just this feature.
So let’s say you open IrfanView and drag an image into the IrfanView window, and then do Image->Resize/Resample to specify your desired image dimensions (this is an important optimization step, too). You are ready to Save your image.
So you go to File->Save As. Two windows appear. One of them is the save options dialog.

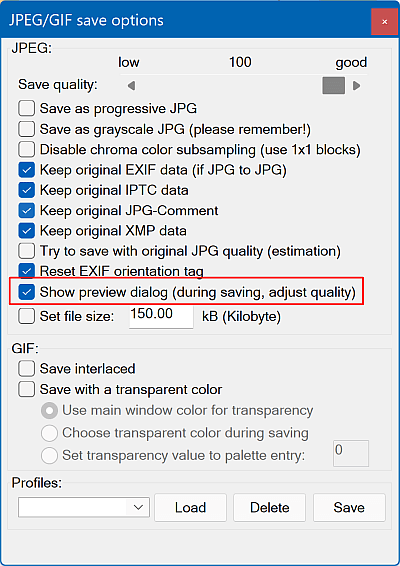
Here, make sure to check “Show preview dialog (during saving, adjusting quality)” to use the compression preview feature. You can still use the quality slider at the top if you do not need a preview. (Clicking Save here will save the options profile, not the image.)
The other window is the browsing explorer window where you will click Save to proceed. Then you will see the preview with the compression slider.
Sample Images
I took an image directly off my smartphone with dimensions of 4032 x 3024 pixels at 4.03 MB.
Let’s resize it to 700 px wide for a typical blog post (I let the height auto-adjust with the same aspect ratio).
We save the image and preview the quality at 100%. The preview shows that the file size would be 304.11 KB if I were to not compress the image at all. Here is that image.

Let’s see how the image looks at 90% quality, where the file size goes down to 110.68 KB, a reduction of over 63%!

If we look at 80% quality, the file size goes down to 73.38 KB. This time, the additional 10% quality reduction from 90% to 80% only produced a 33% file size reduction.

At 70% quality, the file size is 56.73 KB.

We’ve made significant file size reductions with some decreased image quality, but can you tell the difference, and at what point? (Note since 700px is too large to show the images side-by-side as they would appear, you would want to click to open the individual image or download them and compare yourself.)
Conclusions
What are the objective conclusions? I honestly can’t really tell a difference between 100% and 90% quality without zooming in. But at 80% I can start to see a little bit of artifacts or pixelation around the petal tips. At 70% it’s easier to see a light fuzziness across the whole image.
I hope this helps you see how such a huge savings can be obtained with potentially no noticeable difference in appearance.
So the choice is yours. Decide how important quality is for your application, and after some tests, you may decide you want to save time and automate the process without the preview (adjusting the quality with a numerical percentage only).

As for subjective conclusions, in my opinion, the gain at 90% quality is totally worth the compression for use on the web. I would also do 80% with this photo, unless perhaps this photo was going to be used to showcase photography, or there was reasonable assumption people would be looking closely at the photo where it would be critical to look its best. If the photo was something like a screenshot and still very legible, I might go down to 70% where the focus is on information rather than beauty.
